
Zamofilia is extremely popular among houseplants due to its shiny leaves, upright form and high resistance, but the beauty and endurance of this plant also has a limit. After a while, the soil gets tired, the roots take up less space and the growth slows down. The fresh and green appearance gradually gives way to dull and lifeless leaves, and this problem starts when the soil does not meet the needs of our plant. If you feel that the growth of zamophilia has stopped or water remains in the pot and it dries slowly, it is time to change the zamophilia soil. In the following, we will explain all the important points about the time to change the Zamophilia soil, the warning signs, the best soil composition and the exact and practical method of changing the Zamophilia soil, so that you can do this safely.
Click to see the summary of this article with artificial intelligence!
The best time to change the soil of zamophilia
Choosing the right time to change Zamofilia soil is the most important part of the work. This plant has fleshy roots and tubers that store water. Any movement at the wrong time puts a lot of pressure on the root.
What season is the most suitable for changing the soil of zamophilia?
The best time to change the soil of zamophilia is early spring. In this period, the plant enters the active growth phase. The air temperature is balanced and the light has increased. The roots are ready to spread and adapt to the new soil faster. If the soil is changed during this period, the possibility of shock and growth stop will be minimized.
Late winter is also a good time in temperate regions, provided that the cold is completely gone. But changing the soil in autumn and winter is not recommended at all. In these seasons, the growth of the plant is slow and the roots cannot recover quickly. Very hot summers are also not a good time, because the heat and high evaporation cause double stress. Of course, when there is an emergency. You don’t have to wait for spring because saving the plant is a priority.
How often should we change the soil of zamophilia?
Normally, once every two to three years, it is time to change the soil of the Zamophilia pot. If the growth is fast or the roots have filled the space of the pot, this interval may be shorter. Be aware that the replacement interval is shorter in smaller pots. But don’t rely too much on these numbers and be aware that observing external signs is the most accurate way to make a decision.
Signs that indicate you need to change the soil of zamophilia
Zamophilia gives a warning before it is completely damaged. Just look at it carefully.
Slow growth and stop leafing
Slow growth is the first serious symptom. If you haven’t seen new leaves growing for a long time or the leaves are smaller than before, it means the soil has lost its nutrients or the roots don’t have enough space.
Yellowing and darkening of leaves
Yellowing of leaves can be a sign. Of course, improper watering also causes the same symptom. The difference is that in worn soil, the problem persists even with irrigation adjustments. The lower leaves first change color and gradually the freshness decreases.
Soil compaction and difficulty in irrigation
Hardening or compaction of the soil is another important sign. If the water enters the soil with difficulty during irrigation or quickly goes down the sides, the soil structure is messed up. Healthy soil should be light and with good drainage. Dense soil does not provide enough oxygen to the roots and provides the basis for rotting.
The unpleasant smell of the soil and the possibility of decay
The unpleasant smell of soil is a serious warning sign. A musty or musty smell indicates that the root is rotting. In this situation, changing the Zamophilia soil should be done without delay and the damaged roots should be removed.
Roots sticking out of the bottom or surface of the pot
Roots sticking out of the drainage hole or soil surface also has a clear message. Roots seek space. If the pot is completely filled, nutrients will be consumed quickly and growth will stop.
What is the best soil for zamophilia?
Zamophilia roots need light, porous and well-drained soil. Heavy garden soils or completely clayey soils are not a good choice. Such a combination holds water and causes root rot.
Soil characteristics suitable for zamophilia
Good soil should drain excess water quickly, but at the same time retain some moisture to feed the roots. Cactus and succulent mixes are a good option because they have a light structure. However, the addition of high-quality organic matter makes for better nutrition. The presence of perlite, mineral pumice or washed sand helps ventilation. You can even use peat moss or cocopeat to maintain balanced humidity. The balance between moisture retention and drainage is the most important principle in soil selection. The most important thing is that the soil should be fresh and free from pollution and fungus. Using unsafe soil can introduce pests and diseases into the pot and kill your plant within a week.
Suggested soil composition of zamophilia for better growth
To have an ideal composition, you can use a mixture of peat moss or cocopeat, perlite and some rotted leaf soil.
The ideal ratio of materials in the Zamophilia soil
An approximate ratio of two parts light organic matter, one part perlite and one part leaf soil, works best. You can also add a little mineral pumice to improve drainage.
Choosing the right pot is very important when changing the soil of the Zamophilia pot. The pot should be just one size bigger. Oversizing will cause excess water to accumulate. It is necessary to have a drainage hole in the bottom of the pot, even the best soil will not work without water.
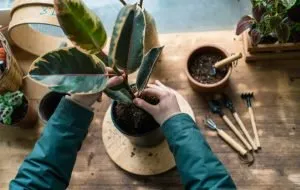
The steps of changing the Zamophilia soil in principle
To change the soil of zamophilia, you need to proceed with patience and focus and go through the following steps:
- A day before starting work, do a light watering so that the soil has a little moisture. Semi-moist soil is easier to separate from the pot and puts less pressure on the roots.
- When removing the plant, gently tilt the pot sideways and hold the stems close to the soil surface with one hand. With the other hand, hit the body of the pot gently to loosen the mold. Do not pull the plant out by force. Allow the weight of the soil to release slowly so that the roots are not damaged.
- After removing the plant, clean the old soil around the roots by hand. Cut out any dark, soft, or smelly parts with clean, sterilized scissors. A healthy root has a bright color and a firm texture. If the tubers are firm and healthy, the plant is in good condition and there is no serious concern.
- In the new pot, first pour a thin layer of fresh soil. Then place the zamophilia in the center and adjust the height so that the crown of the plant is level with the edge of the pot. Fill around the roots with fresh soil mix. Do not press the soil too much; Just firm it up a little with the palm of your hand so that the plant stands straight.
- At the end, do a gentle watering to settle the soil and fill the empty spaces between the particles.
Care after changing the Zamophilia soil
After changing the Zamophilia soil, irrigation management is very important. The same initial watering is enough to moisten the entire bed. Then let the soil surface dry and then water again. Newly transplanted roots react negatively to an environment of constant moisture and are quickly damaged.
In the first days, place the plant in a place with soft and indirect light. Strong light can cause stress and make the leaves appear limp. After one to two weeks when you see signs of stability, return the pot to its original location.
Do not rush to fertilize. Fresh soil provides the necessary nutrients to the roots. Wait about a month and then start feeding with a mild dose of houseplant fertilizer. Excessive fertilization at this stage will damage the roots instead of helping them.
A few leaves may show slight drooping after moving. This is a normal reaction. If you keep the light and watering conditions balanced, the plant will regain its normal shape in a few weeks and show even fresher growth.
Common mistakes when changing soil zamophilia
- Choosing a very large pot and water accumulation and root rot
- Using heavy soil without proper drainage
- Excessive watering immediately after replacement
- Compact the soil around the roots
- Fast fertilization after changing the soil
- Neglecting to check the health of the roots when transplanting
summary; How to have a healthy and growing zamophilia?
Changing the soil of zamophilia is not a complicated task, but its effect on the health of the plant is very serious. When you choose the right time to change your zamophilia soil, use a light, well-draining mix, and follow the steps carefully, the roots will have a chance to breathe and grow again. With a little care and patience, this plant will remain green, strong and eye-catching in your space for years.
Source: Digikala Mag

RCO NEWS