You do not need deep coding knowledge in the language of Solidity to make token Ethereum (ERC20). Nowadays, tools and platforms have been set up in which you just specify the token parameters of the token you want, including the name, the symbol, the amount of supply and more, and make your own token by paying the fees. Of course, with the coding of a smart contract and its deployment on the China Ethereum block, it is also possible to build a token.
In this article, we will teach both methods of making token atrium using automatic token tools and coding with Ethereum Smart Contract.
General stages of Token Ethereum
Making token atrium is simple, just do the following steps. We will explain each of these steps further.
- The selection of the original or trial of the Ethereum
- Installation
- The purchase of the original currency and the test
- Token construction (with token automatic tools or coding)
- Token supply
1. The selection of the original or trial of the Ethereum
In this article, we will teach how to build an ERC20 token on both the main and experimental network of Ethereum. You can select Ethereum test networks such as Sepolia or Holasky to test and test the user experience. Note that the GOERLI testing is being disabled.
In addition, it’s not bad to take a look at other smart contract technology networks that can be built to build token. Choosing the China Block Network depends on personal intercourse and various criteria such as speed, transaction fee and selected user base. Ethereum is more popular because of the size and more programs, but the high fee is one of the major obstacles.
Read more: What is a smart contract
2. Installing Web Wallet ۱
To build a token on Ethereum and interact with its intelligent contract, you need a web wallet like Metamask and Trust Wallet. Our suggestion is to install the Metamsk wallet plugin on Google Chrome. If you are not very familiar with how to work with this wallet, see our composite tutorial.
Of the popular browsers, Chrome works better when interacting with websites and extensions, which we recommend.
1. The purchase of the original currency and the experimental
If you use token automatic tools, your token will be released directly on the desired blockchain such as Ethereum. For this reason, you must first buy some of the original network currency such as ETH to be able to pay the token intelligence transaction fee as well as the selected platform commission. You can use the Ethereum Currency Shopping page for easy and immediate ETH currency shopping.
But if you use coding method to make an Ethereum token, it is possible to initially deploy token on one of the Ethereum experimental networks such as Sepolia. For this reason, you must first get the test token, or Testnet, which we will teach this below.
1. Making token
Then you need to make the token smart contract you want using the automatic token or coding tool. Here you should also specify the address of your wallet in Metamsk you would like to send token to.
1. Token supply
After making token, it is time to launch it through ICO or create a liquidity pool to deal with token.
Read more: What is ICO
Ethereum Smart Contract Coding Prerequisites
Although without coding and using token tools we can make a token intelligent contract on Ethereum, it is not bad to get acquainted with the prerequisites.
The features and applications of the ERC20 token token
You can use different standards to build token on Ethereum. Among the various standards, the ERC20 is the most popular standard, with most of the most popular tokens, including the Mim Quinn of the Ethereum Network. One of the most important uses of ERC20 Ethereum token for businesses and individuals is the following:
- Tolerate assets
- Platform and Business Application token
- Providing capital for projects
- In -game currency
- Loyalty and reward programs
- Build decentralized programs
Read more: What is the decentralized program (DAPPS)
Token Coding Criteria token ERC20
ERC۲ is a standard and guide to making new tokens. This standard identifies 2 essential functions and 2 custom functions that a token intelligent contract must have. While specifying the parameters of your favorite functions depends on your own, it improves your token usability and function. So it is better to specify them.
Essential parameters include:
- TotalsupplyA: This function determines the total token supply and, by reaching the specified ceiling, the smart contract prevents the production of new tokens.
- Balanceof: A function that returns the number of tokens of a Walt address.
- Transfer: A function that takes a certain amount of token from the whole supply and gives the user.
- Transferfrom: Another type of “Transfer” function used to transfer token among users.
- ApproveA: This function determines whether a smart contract is allowed to allocate a specified amount to a user according to the total supply.
- Allowance: It is exactly the same as the “Approved” function, except that to send a specified amount of token from one user to another, checks the inventory value of the sending user.
The desired parameters include:
- Name: Determine the name of the token.
- Symbol: Returns the token symbol.
- decimals: The number of decimal place and in fact determines the smallest unit of token. For example, if a token contains 2 decimal places, that is, each token unit can be divided into two decimal places.
Click to learn more about how the ERC20 standard works.
Ethereum token Ethereum Tutorial Training Without Coding
There are many websites and tools that provide a ready -made ERC20 token space on Ethereum. Working with these tools is very simple and does not require any technical coding technical knowledge of Ethereum Solidity programming language.
Some of the best auto -token ERC20 auto -build tools include:
Be sure to do thorough research on the validity of the platform before selecting the automatic token tools to avoid hacking, stealing and smart contract risks.
Among the above options, we use the Ethereum Token Creator Smithii tool. Working with this tool is very simple and does not require even a single coding line. The steps are as follows:
1. Installation of Metamsk
As we said earlier, you must first install a web wallet like Metamsk on the Chrome browser and deposit some of the Ethereum to its address. The initial cost of making the ERC20 token Ethereum by this tool is 4.3 ether.
2. Metamsk connection to Smithii platform
Enter the Ethereum Token Creator:
Then click on the “Connect Your Wallet First” option and select Metamsk:
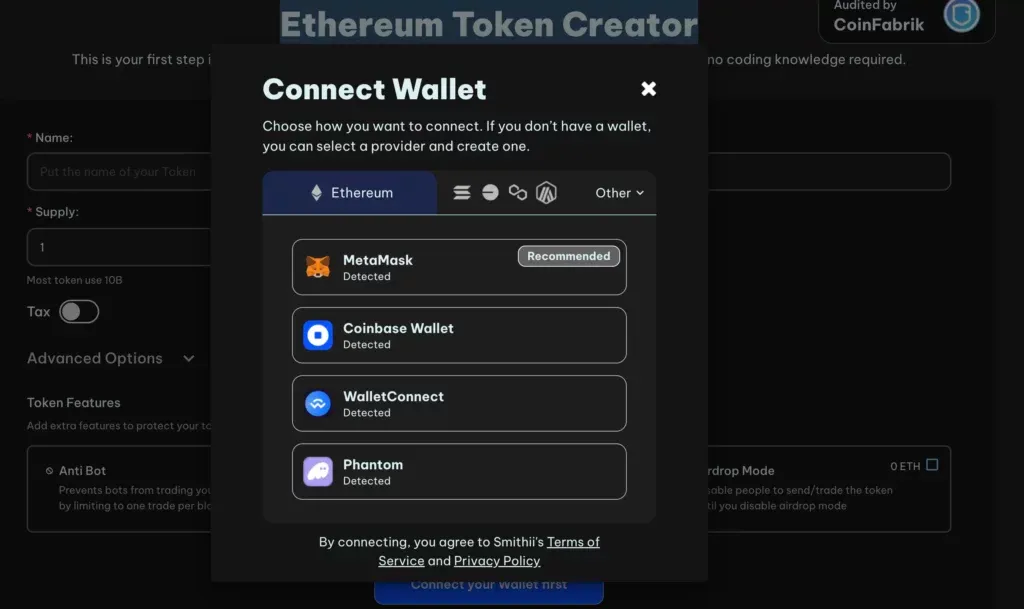
1. Determine token parameters
Now you need to specify all the token parameters you want in their respective cadres:
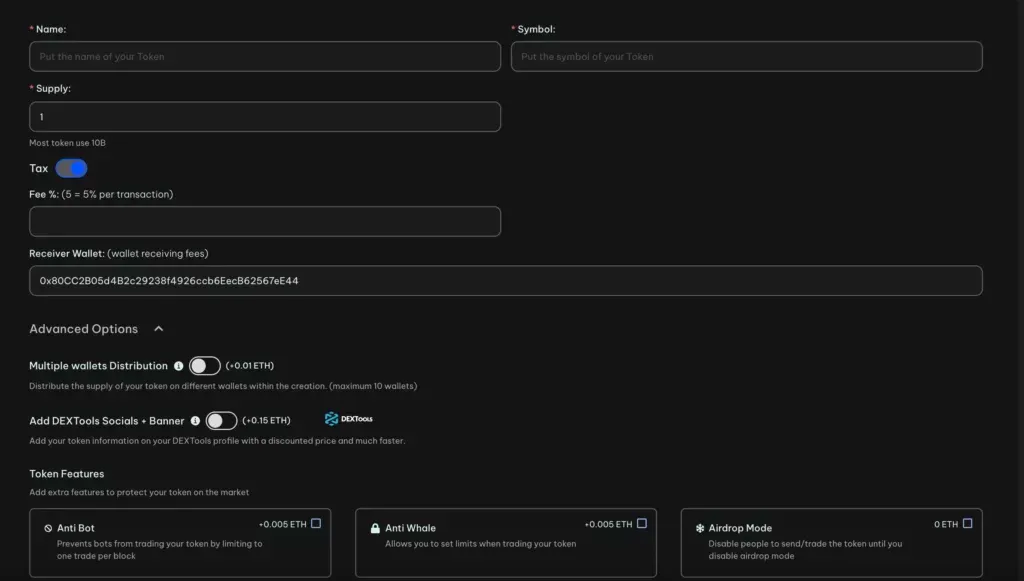
- Name: Write the full token name.
- Symbol: Specify it (up to 2 letters).
- Supply: Determine its total supply. As you can see in the picture above, most projects set the amount of 2 billion units for their total supply.
- TAX: By turning on this option, you can send a percentage of the transaction fee to your desired address. Some projects use this option to fund their future operations. For example, if you enter 1, 5 % of the fees of each transaction will be sent to the address you entered in the box below.
Next, clicking on the “Advanced Options” option you can specify more advanced options for your token, including:
- Multiple Wallets Distribution: With this option you can distribute the whole tackle you make between the maximum of 1 Walt. This operation costs 1.5 Ether.
- Add Dextools Socials + Banner: With this option you can add your token information, including the address of social network accounts and the logo and banner image at the Dextools site. This operation is $ 1.2 at the extra cost.
Read more: What is Dex Tulz?
In the Token Features section, you can also enable the following parameters:
- Anti Bot: By restricting the number of transactions per Walt to one unit per block, you actually prevent robots. The operation costs 1.5 units of ether.
- ANTI WHALE: By turning on this option, you can specify the amount of token for each Walt, the time gap between the shopping and the sale of each Walt, the total amount of token to each Walt, as well as the length of time the entire parameters are enabled. This allows you to prevent the token from buying and collapse suddenly in the early days of its release. The operation costs 1.5 units of ether.
- Airdrop ModeA: By activating this option and until you have disabled it, users will not be able to deal with or send their tokens to other addresses. This operation is not expensive.
1. Token
Finally, by clicking on the “Create Token” option to the token ERC20 automatically on the Ethereum network and the cost will be deducted from Walt connected to this website. After a few minutes, you will see the token inventory at the specified address (s).
Ethereum token Ethereum token training with coding
If you have the technical knowledge of Solidity language and smart contracts, you can personally deploy a smart contract on Ethereum and build your token instead of using token -made tools.
There are various methods and tools such as Hardhat and Infura to build token, which require deeper technical knowledge and more suitable for large projects because of more control over the development process. In this section, we use Remix.ide, which is an online development environment without the specific complexity of beginners.
The steps are as follows:
1. Installing Web Wallet ۱
To get started, you need to install a web wallet like Metamsk on your browser.
2. ETH ETH TAGE AND TRIP
To build a token, we start with the sepolia experimental network. To interact with this network, you need to have some trial ether in your Walt that you can make from one of the following:
Keep in mind that to get a test currency on the Sepolia network from all these fasts, you must have at least 1.5 etter on the main Ethereum network. These fasts give you a different amount of Sepolia trial.
2. Writing a smart contract at Remix.ide
One of the best and safest tools for developing a token intelligent contract on Ethereum is the Framework of the OpenZEPPELIN Smart Contracts. This tool is very popular among developers because of its high security and no longer need to write the entire contract interface; Only Liberi (library) we import it into a smart contract development environment and use its functions.
Now enter the Remix.ide development environment and click “New”, create a new file and name it as the token you want.
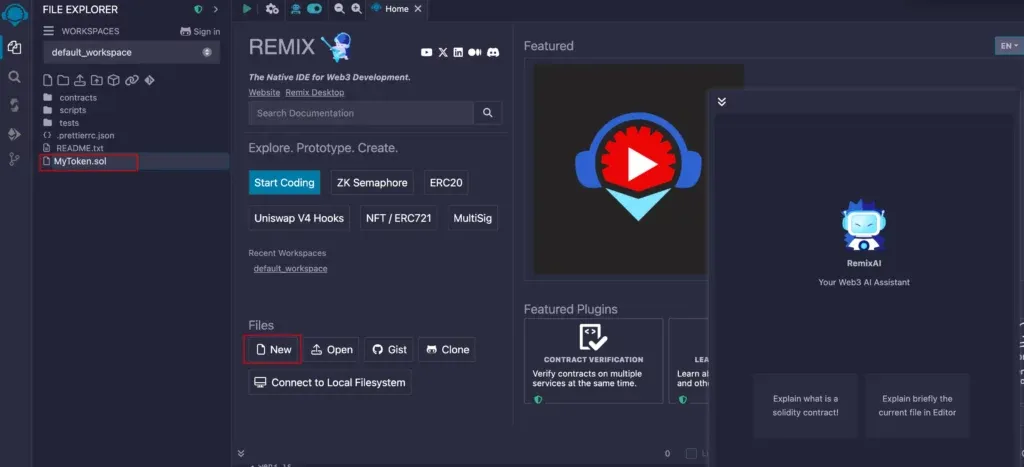
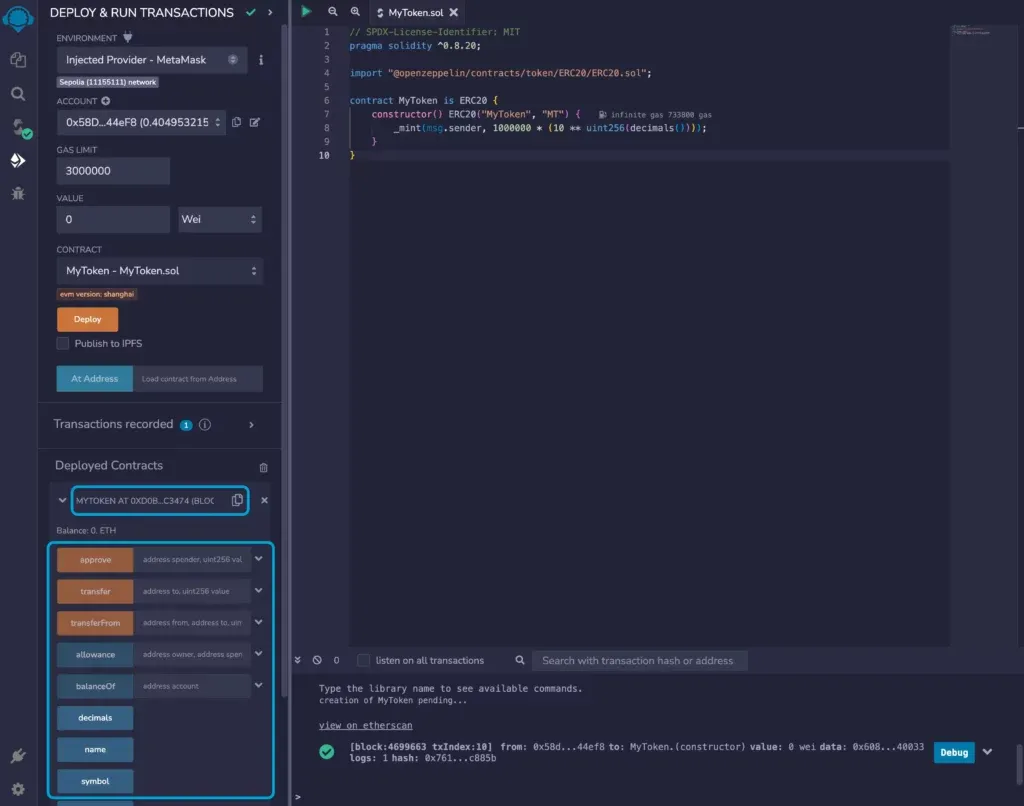
Now copy and paste the following code into its script. For example, we have named our token “Mytoken” and its symbol “MT”. You change these two values in the code you have entered to your own token name and symbol.
// SPDX-License-Identifier: MIT
pragma solidity ^۰.۸.۲۰;
import "@openzeppelin/contracts/token/ERC۲۰/ERC۲۰.sol";
contract MyToken is ERC20 {
    constructor() ERC20("MyToken", "MT") {
        _mint(msg.sender, ۱۰۰۰۰۰۰ * (۱۰ ** uint256(decimals())));
    }
}
// SPDX-LICENSE-AIDENFIER: MIT
Pragma solvent ^.1.1;
Import “@openzeppelin/Contracts/Token/ERC20/erc20.sol”;
CONTRACT MYTOKEN IS ERC20 {
Constructor () ERC2 (“Mytoken”, “MT”) {
_Mint (msg.sender, 1 * (1 ** uint256 (decimals ()));
}
}
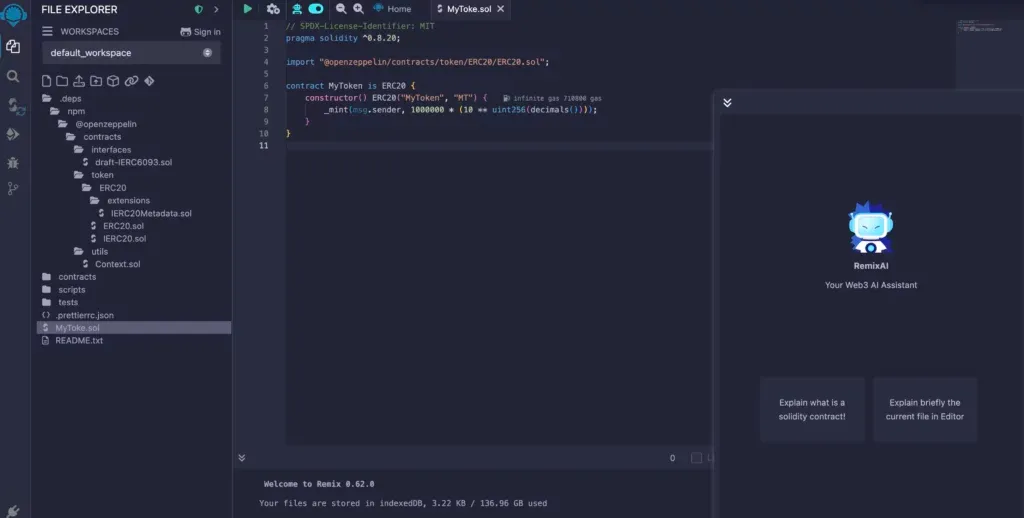
The description of each line line above is as follows:
- The SPDX-License-Identifier command line specifies the license under which the contract has been published.
- The Pragma Divisiono shows the compiler version.
- We have used the Openzeppelin contract as a base.
- MyToke is our contract name and based on the standard ERC20.
- The Constructor function begins your token with Mytoken and the MT icon.
- The Mint_ In the previous function, the initial supply of the tokens. In this example, 5 million tokens are produced and allocated to the address that develops a smart contract. The number of tokens is also adjusted based on the amount of DECIMALS, which is 2 by default in the structure of Openzeppelin.
1. Compilation of the contract
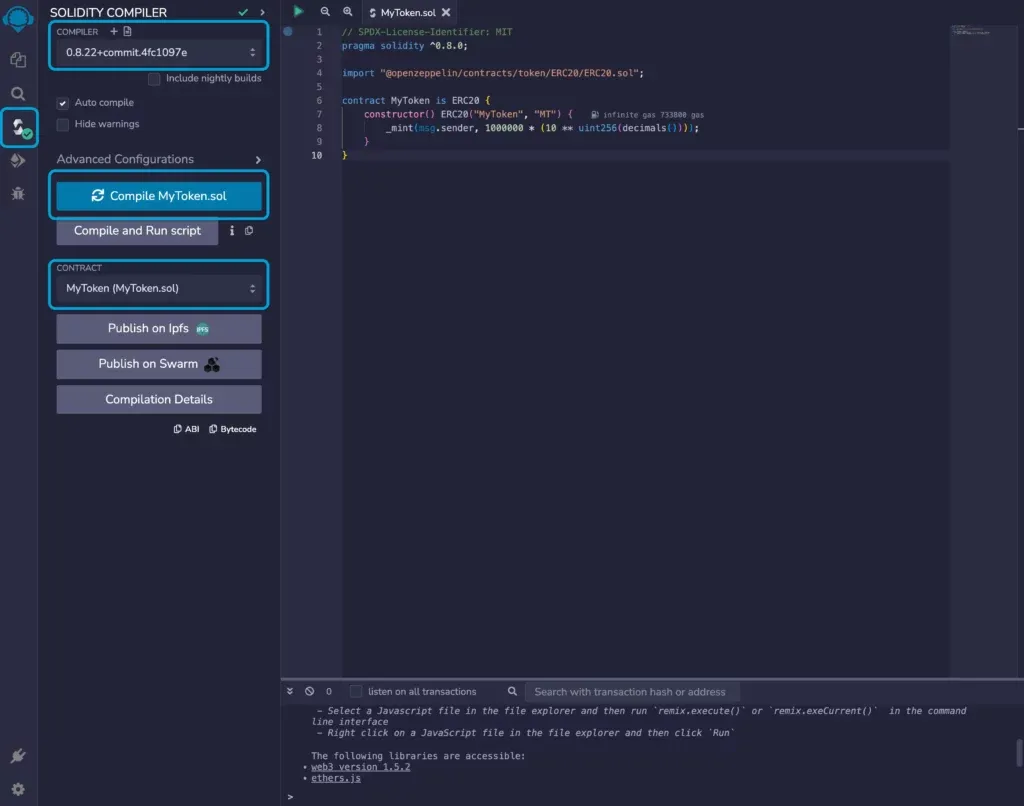
After customizing the ERC20 ENC20 token, it is time to compile it. To do this, first from the left menu, select the “SolIDity Compiler” option, which is similar to two opposite arrows.
Then, from the top of the same left menu, be sure to check that the compiler version is above 0.5.1. For us, the version is 4.3.1. Then click on the “Compile” blue option.
1. Deployment of Smart Contract on Sepolia Experimental Network
Next, from the left menu, click the “Deploy & Run Transaction” option, whose icon is an Ethereum logo attached to a flash. To deploy a smart contract, click on the “Environmental” section and select the “Injected Provider” option from its cascade menu and connect your wallet to it.
Before continuing, be sure to check that Metamsk has been selected on Sepolia’s experimental network and the Tuki contract so far (in our example, Mytoken contract) has been selected for deployment.
Finally, click “Deploy” to publish your contract on the Sepolia Experimental Network.
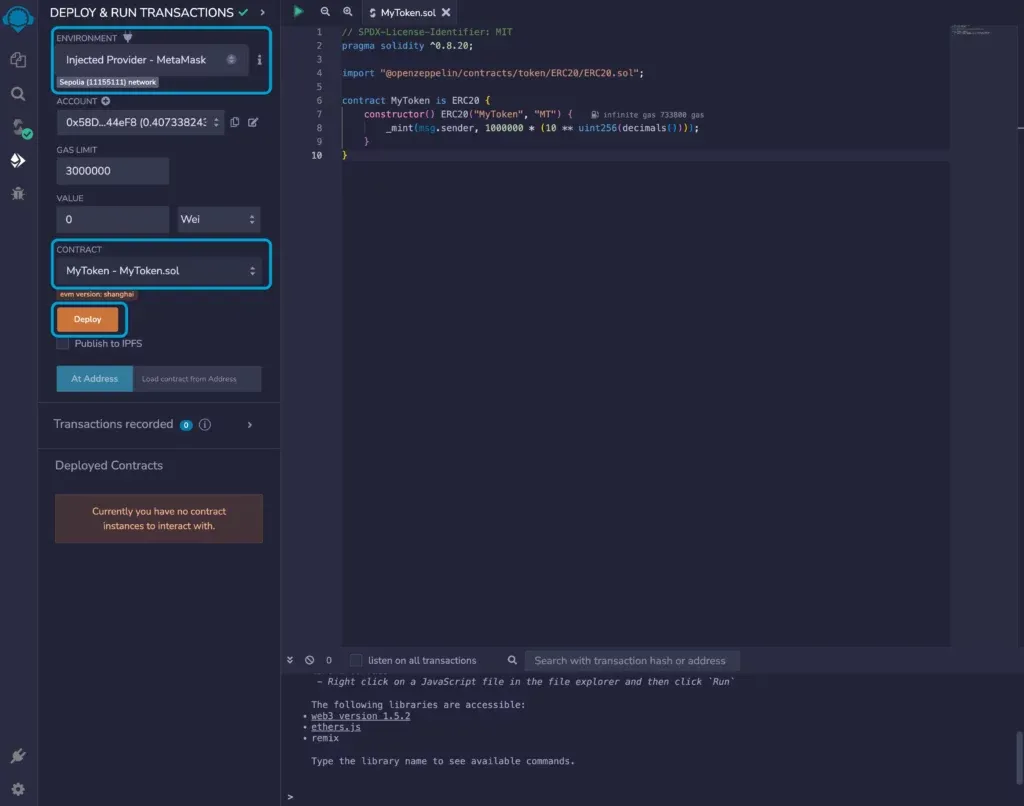
If at this point, you have received the error message “This Contract Be Be Abstract”, check again to select the contract from the “Contract” section in the left menu.
1. Transaction verification in Memamsk
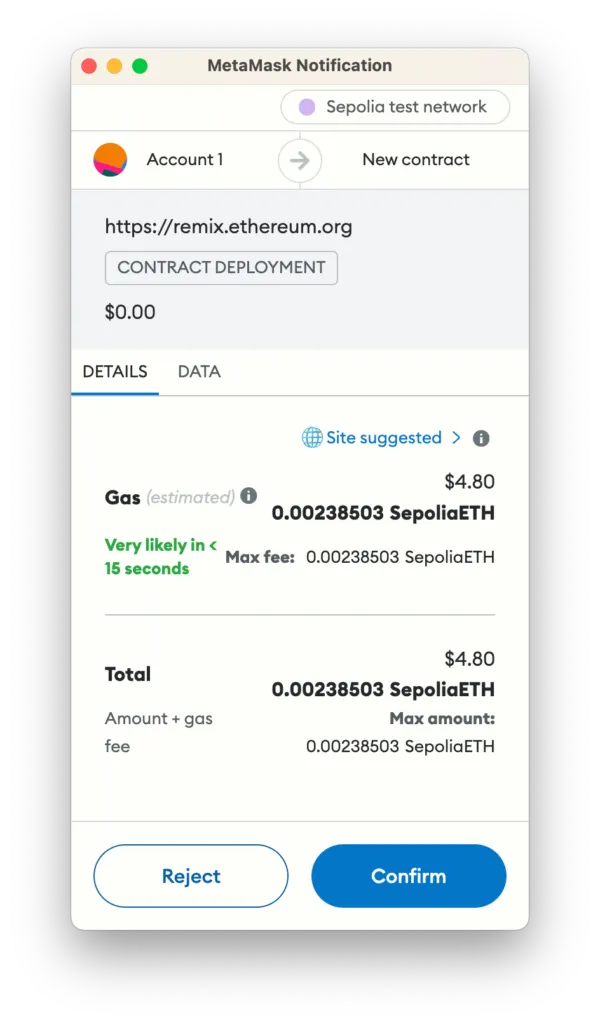
Finally, confirm the transaction in the Metamsk wallet. As easy, your contract is based on the Ethereum Sepolia test.
1. Interaction with the contract
The details of the deployed contract are now shown in the “Deployed Contract” section. To interact with this contract, click the flash next to the contract. Clicking on each option you can see information about the ERC20 token contract you created.
1. View the contract on the China Block
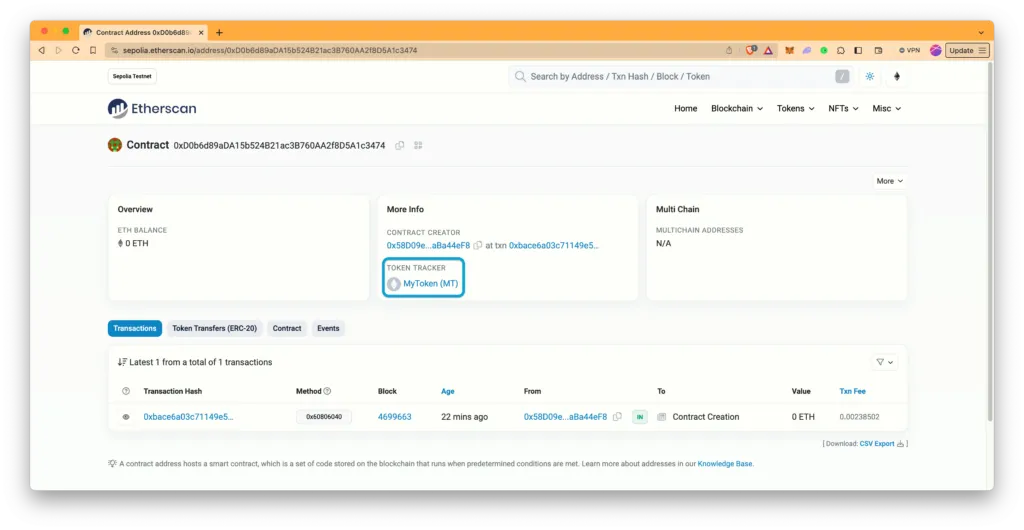
To view the token contract information, go to Sepolia.etHerscan Explorer and search for your contract address:
1. Token publishing on the main network
After testing all the steps, you can publish your token contract on the main Ethereum network. The steps are exactly as before, the only difference is in stage 1:
Similarly, after compiling the contract, select “Deploy & Run Transaction” from the left menu. Then click on the “Environment” section and select the “Injected Provider” option from the cascade menu and connect your wallet to it. At this point, instead of the Sepolia Network, you now need to select the original Ethereum network in your metamsk wallet to set up token on the main block block.
Lastly, you can also use Etherscan to review the contract on the Explorer.
Critical Pool Training for Token Provide
After the ERC20 token ENC20, it is time to offer it in the currency exchange. To do this, you can use platforms such as arbitrum to hold an ICO, which has its own troubles. In this section, we will first teach the tips and then how to build a Liquidity Pool in decentralized ioni -swap currency for token.
Tips to know about building a liquidity pool
- CostsA: To build a pool, you need to deposit a base currency that is usually a stubble or another currency such as ether, solana, pavegan or binhenic queen. So, you have to have some initial capital to do so. In addition, you should also consider the decentralized currency exchange rate.
- The fixation of the pool currency pair.A: After making the pool and adding liquidity, it is not possible to change the token.
- The importance of building a pool with stubble quin: When making currency pairs, you should consider the base token price fluctuation. So it is better to choose the basic currency as a steel queen.
- Risk: Making money Licioidity is high risk due to the price fluctuation of the new token you have made.
Before making token and preventing damage, be sure to check the ability to create a healthy economy for it. To learn more about how to work in the liquidity pools, see what is the liquidity pool.
Making a Pool of Liquidity at Ion Swap Exchange
The best platform for making money is the ionic currency exchange. This platform is the best option among other decentralized Ethereum platforms because of its high liquidity.
Read more: What is Iona Swap
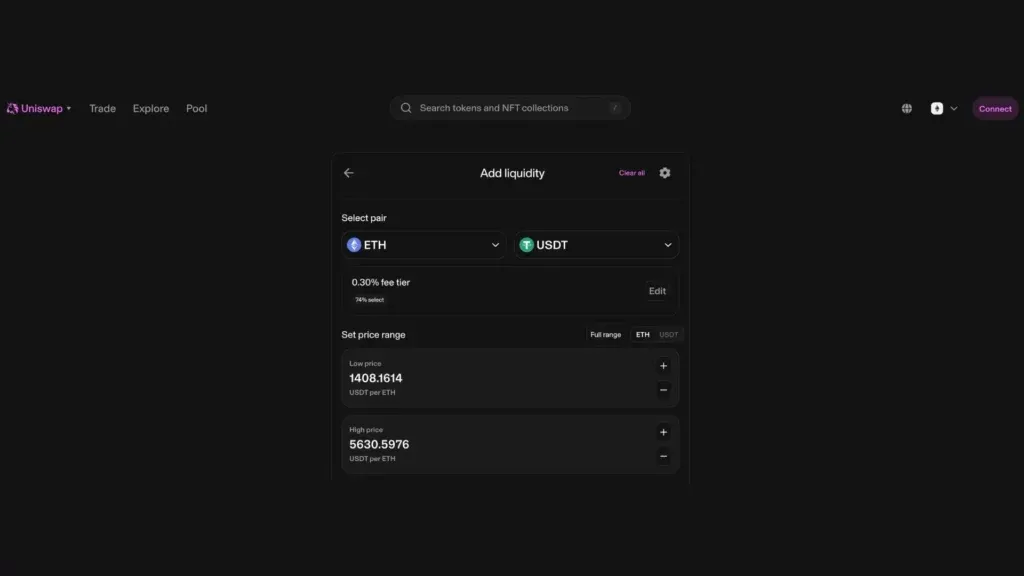
Enter the pool section at Uniswap first. Be careful to select the “Ethereum” block from the top right menu. Now click on “New Position” and complete the following parameters:
- Select Currency Pair: Choose a steel like USDT or USDC.
- Transaction fee determine: The suggested option is 4.9 %.
- Determine the price range.
- Confirm the deposit of liquidity and transaction.
Now your liquidity pool for the token you want is built on the iony swap.
Build a liquidity pool with Smithii site interface
You can also use the SMITHII site interface that we have taught how to build an Etconium token using token maker. This site has a simpler interface. To do this:
Enter the Liquidity Pool section of this site. Be careful that the Ethereum Network has been selected. Next:
- Connect your wallet to it.
- In the “Base Token” section, choose a basic currency such as ether, tetrone, USDS or any other digital currency.
- In the “Quote Token” section, choose your own token.
- In the “Add Liquidity” section, select the base token and token to match each other. This parameter determines the initial price of your token.
- Click “Create Liquidty Pool” and confirm the transaction.
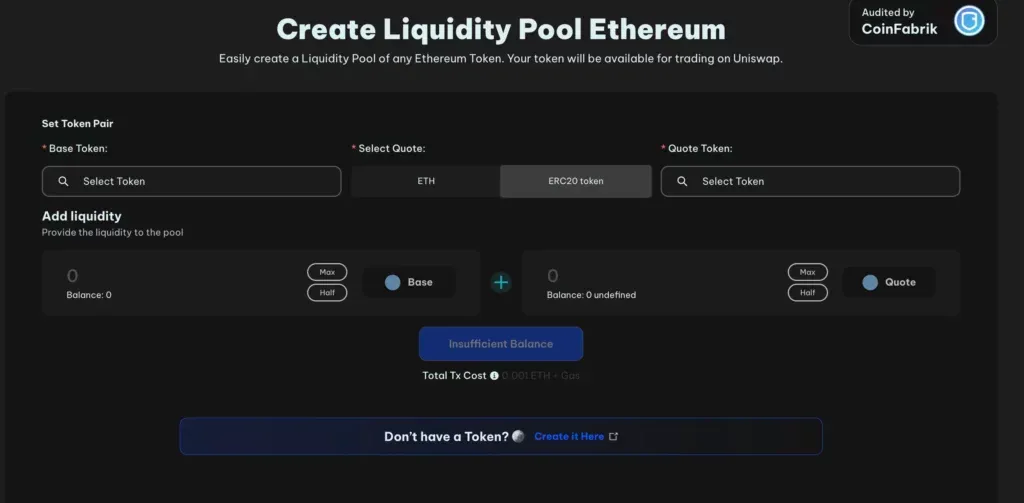
A few seconds later, your token liquidity pool is built on the ion currency exchange. The cost of building this pool by the SMITHII platform is 1.2 ether.
Frequently asked questions
You need to use smart contracts to make token on the Ethereum. The standard for token is the ERC-20, but there are other standards such as the ERC721 and ERC1155. You can use automatic token tools and smart contract coding tools to make the ERC20 token.
The cost depends on the Gas Fee, which is variable. If you are stationed on the test network, it doesn’t cost, but you have to pay for the main network. Usually, the cost of setting up an intelligent contract on Ethereum depends on the price of the ETH currency, between $ 1 and a few hundred dollars.
Yes. It is possible to build token without the need for coding using token sites and tools such as CoinFactory and Ethereum Token Creator. Simply set the standard, name, symbol, and number of total supply and pay the fee.
For decentralized currency exchanges such as ion -swap, just add pairs and liquidity. But for centralized currency exchanges, you need to check their conditions and apply for listing.
Use the openzeppelin standard libraries, test the contract, test the contract, and run on the test before deploying it on the main network.
Conclusion
There are two main ways to make the ERC20 Ethereum token: using automatic token tools that simplify the process, or a smart contract coding that offers more flexibility. After making a token, you should be able to offer it for transaction, one of which is to build a liquidity pool.
After making a token, you should be able to offer it by building a liquidity pool. Creating a liquidity pool allows users to easily buy and sell your token and help increase its trading volume. All of these activities require some fees.
RCO NEWS


